

How To Paint Pale Skin Warhammer
People come in all shapes, sizes, and colors and the warriors of the Mortal Realms/41st millennium are no different. In this article, we'll cover the basics of human being skin in a variety of different shades, including the principles behind color and different techniques for giving flesh to your tabletop warriors. Annotation that in this article, we're merely covering regular, bog standard human skin, and whatever races that have similar skin, such every bit Aelves, Aeldari, Dwarves, Squats, Scrunts, and whatever else. If you are a transhuman/magic space elf/extragalactic existential horror yous can do pretty much whatever you want, only residuum assured that we'll be covering more than fantastical races in hereafter installments of How to Paint Everything.
Why carp?
I will be frank, if your aim is to paint a 200-model Purple Guard ground forces, then whether or not you've painstakingly dotted all the pupils or given them simulated stubble will matter not one whit. Spray Wraithbone, slap on Contrast, call it a twenty-four hours. From a distance and en-masse, the subtleties of the techniques elaborated hither are lost and a meticulously painted and shaded 28mm face up at iv anxiety is little different to a ii second Dissimilarity task. Though even for quicker jobs that demand to exist replicated at scale, there are some things to go on in mind about painting different skin tones, which can help if you want an piece of cake way to add variety to a large army made of warriors from varied backgrounds.
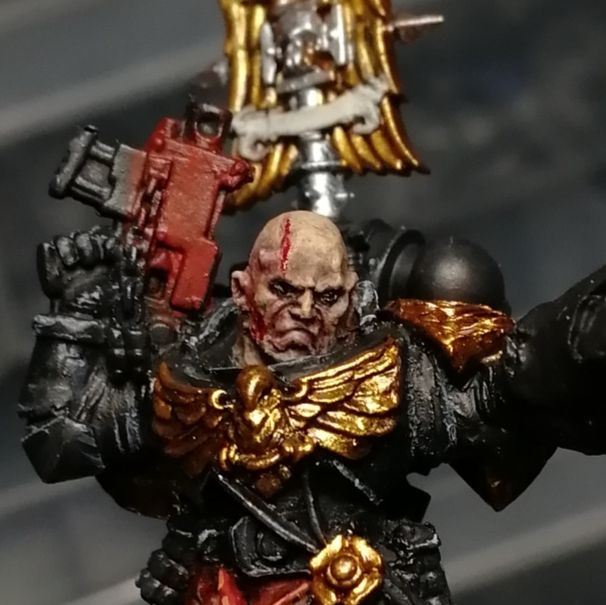
Where skin painting skills really shine through when your miniature is going to exist viewed at close range – in photographs, display cases, competitions or eBay. In these instances, a well executed confront acts equally a fantastic focal point as the human eye volition naturally gravitate towards it. Conversely, doing a subpar task on a miniature'southward face has the potential to drag the rest of the paintjob downward since information technology'south the one identify anybody will focus on.
A Quick Science Lesson
Contrary to what many pots of paint would have you lot believe, there is no single "skin tone". The reason for this is because human skin is a circuitous, multilayered structure and derives its colour as a sum of its components, much of which is constantly in flux in life. Skin is translucent and "skin colour" is largely a combination of the colours present inside the pare – the pigment melanin, ruby of blood and yellow of fat. If y'all have had the misfortune of seeing a corpse, so you can observe the sallow cast that develops – the loss of blood from the skin on expiry leads to a loss of 'red', leaving the melanin and fatty behind.
As a result there are significant colour and textural variations present in everyone's peel – this is more prominent among those with darker skin, but even the palest basement-dwelling goons will still have a caste of variation. The palms and soles tend to be lighter, every bit do the covered parts of the torso. Pale skinned people develop freckles while darker individuals take a tendency to develop lumpy keloid scars etc.
Melanin is the master pigment that gives pare its colour, and information technology comes in ii varieties – yellow-orange phaeomelanin and brown-black eumelanin. How "white" or "black" someone appears is dependent on the ratio of these two pigments within the skin. The darker paint (much similar dark paint) is also more opaque and obscures the contributions of the other skin components. Someone with 'Type I' peel for case, has ginger/blonde pilus, blue or pale light-green eyes and very pale, well-nigh white pare. This is due to almost consummate potency of phaeomelanin. The tiny underlying claret vessels inside the skin give it a pink glow. Every bit i's skin becomes darker, the colour shifts from a pale orangey-pink to a yellow/olive intermediate before progressing into a dark, warm brown. A point to notation is that even the darkest skinned individuals have blood, so their skin volition ever tend to take a warm, reddish cast. Functionally, this ways that highlights should exist constructed with increasing levels of both xanthous and ruby. Using a cool highlight tone (green/blue) tin give an unnatural advent and should be avoided unless a specific effect is called for (I.e. Salamander 'black' skin, OSL). Conversely, albinos have a total lack of whatsoever melanin, and they actually look white or pink depending on blood supply, with white hair and red eyes.
The Fitzpatrick Skin Blazon Scale provides a crude but effective way of quantifying the colour of an private'due south skin (strictly speaking the response to UV radiation), with I being the lightest and VI existence the darkest. In essence:
- Ginger/blonde hair, blue/dark-green eyes, very pale skin – Irish/Nordics.
- Mousy/brownish hair, off-white pare – typical Anglo-Saxon
- Dark hair, dark optics. Darker skin disposed to olive – Mediterraneans, pale E Asians, Latinos
- Dark hair, night eyes, olive peel. Large variation hither as you go the more xanthous E Asian skin with the more than dark-brown-yellowish skin of Mediterraneans and Latinos also fall within this grouping.
- Dark hair, dark eyes, dark (but not black) skin. Nearly Due south-East Asians, Polynesians, Due north Indians, Eye-Easterners volition fall here.
- Blackness pare – Blackness Africans and Southern Indians.
These principles tin can be extended to our favourite fantasy races:
Orks can accept green skin and drain red because the light-green pigment in their skin would absorb the scarlet, leaving none to reflect off the underlying vasculature.
Tau (at some point in the fluff anyhow) have bluish copper-based blood, and are hence various shades of bluish.
ZIVth's Scientific Approach
Then how does the in a higher place relate to painting our niggling toy mans? I lack a background in fine art, so my technique relates very much to my understanding of skin biology. The effect is more generically 'realistic' merely it doesn't necessarily give the wilder tonal variations and dial that a more creative approach can provide. See Felime'south bits for that.
In full general, I split up my colours into the reds, yellows and browns. This is my skin palette (from light to dark):
Central: VMC = Vallejo Model Colour. Citadel colours are named as-is.
| Reds | VMC Salmon Rose, VMC Rose Brownish |
| Yellows | Citadel Wraithbone, VMC Deck Tan, VMC Dark Sand, VMC Calorie-free Flesh, VMC Basic Skintone, Citadel Kislev Flesh, VMC Medium Fleshtone |
| Browns | VMC Burnt Umber, VMC German language Camo Black Brown |
| Spot Colours | VMC Medium olive, VMC Burnt Red, VMC Red |
| Washes | Seraphim Sepia, Reikland Fleshshade, Gulliman Flesh, Carroburg Crimson, Drakenhof Nightshade, Volupus Pink |
Paint Recipes
General Principles
Using the Fitzpatrick Pare Type scale above, at that place are different pigment combinations I utilise for mixing each type:
- Blazon I-Ii: Reds + Yellows
- Type Three-IV: Dark Reds + Yellows
- Type 4-V: Yellows + Browns
- Type Half dozen: Browns -> Highlight with lighter brown and improver of yellow or red
Green can be added in tiny amounts to desaturate the colour mix if it becomes also brilliant, counteracting the reds.
Correct the tones to taste with washes:
- Seraphim Sepia makes things yellow – beware of overdoing this lest your skin take on a jaundiced look.
- Reikland/Gulliman/Carroburg adds various degrees of cherry and generally richens the tone
The various components of these recipes can be mixed and matched to conform the final tones. As long equally you bandy tones within the same general categories, you can develop many interesting variations. If broad swathes of skin are being painted on a figure, applying a degree of variation to the tones (by swapping the components around) in the skin volition give the pare a more realistic appearance..
Examples of This (1)
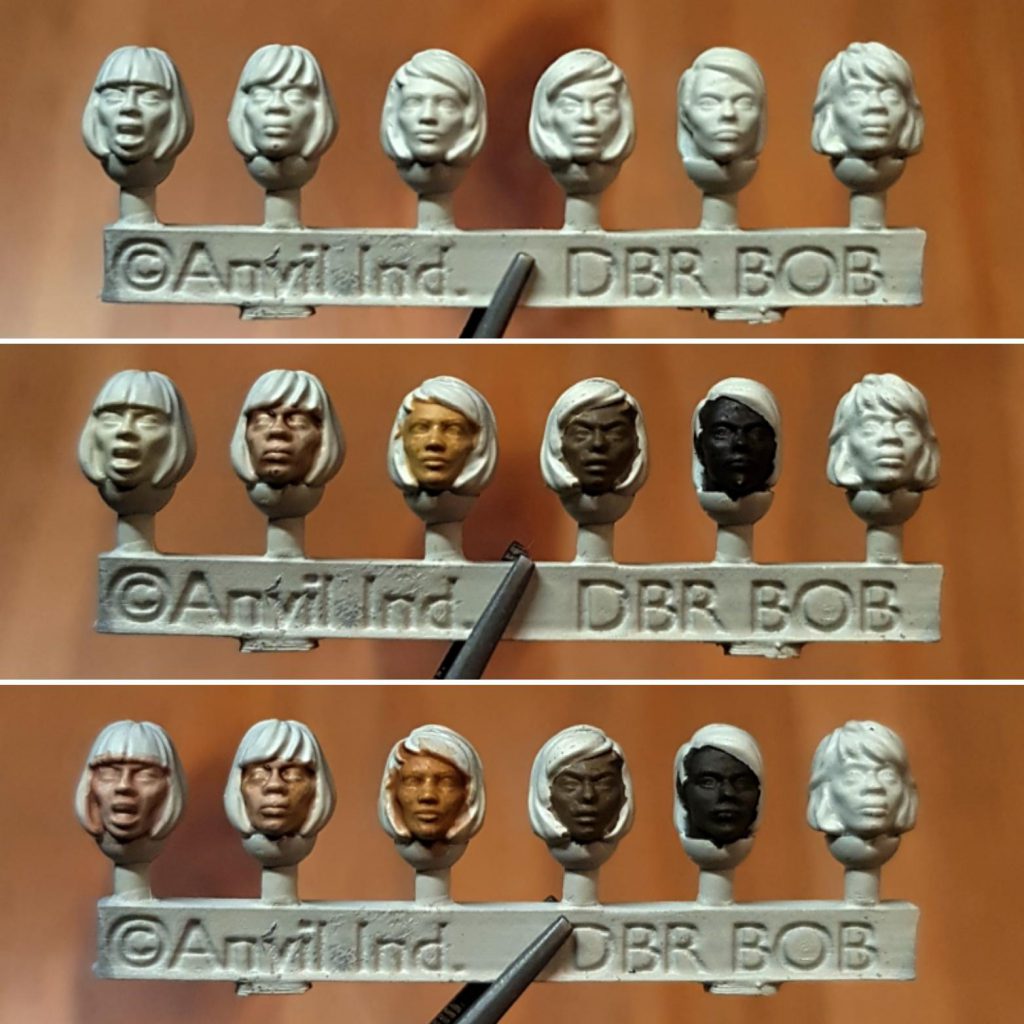
Basecoat: Wraithbone
From Left to Right
Type I (Irish gaelic)
- Basecoat: Salmon rose + Calorie-free Flesh + Medium olive (1:ane:Trace)
- Shade: Reikland Fleshade + Carroburg Crimson + Lahmian Medium (one:1:one)
- Highlight #1: Salmon rose + Light Flesh + Medium olive (1:ii:Trace)
- Highlight #two: Light flesh
- Highlight #3: Light flesh + Wraithbone (1:1)
Type Ii (Caucasian)
- Base and Shade: Gulliman mankind
- Highlight #1: Kislev Mankind + Salmon Rose (1:one)
- Highlight #ii: Kislev Flesh + Salmon Rose + Calorie-free Flesh (i:one:ane)
- Highlight #3: Salmon Rose + Medium olive (ane:Trace)
- Highlight #4: Salmon Rose + Wraithbone (1:one)
Type IV (South-East Asian)
- Base: Medium Fleshtone + Rose brown + Medium olive (1:1:Trace)
- Shade: Reikland Fleshshade + Seraphim Sepia (1:1)
- Highlight #1: Medium Fleshtone + Dark Sand (2:one)
- Highlight #2: Medium Fleshtone + Dark Sand + Salmon Rose (one:one:ane)
- Highlight #iii: Dark Sand
- Ruby tone adjustment (Glaze): Reikland Fleshshade + Lahmian Medium (1:1)
Type V (Due north Indian)
- Base/Shade: Burnt Umber + Medium Fleshtone (1:1)
- Highlight #i: Burnt Umber + Medium Fleshtone + Kislev Mankind (1:1:1)
- Highlight #ii: Burnt Umber + Medium Fleshtone + Kislev Mankind (1:2:1)
- Highlight #3: Burnt Umber + Medium Fleshtone + Light Flesh (one:one:i)
- Highlight #4: Burnt Umber + Medium Fleshtone + Dark Sand (Trace:ane:1)
- Red tone aligning (Glaze): Reikland Fleshshade
Type Six (African)
- Base: German language Camo Blackness-Brown
- Highlight #1: GCBB + Medium Fleshtone (1:1)
- Highlight #2: GCBB + Medium Fleshtone + Rose Brown (ane:one:1)
- Highlight #iii: GCBB + Medium Fleshtone + Light Flesh + Medim olive (1:one:ane:Trace)
- Highlight #4: GCBB + Medim Fleshtone + Night Sand (Trace:one:one)
- Red tone adjustment (Glaze): Reikland Fleshshade
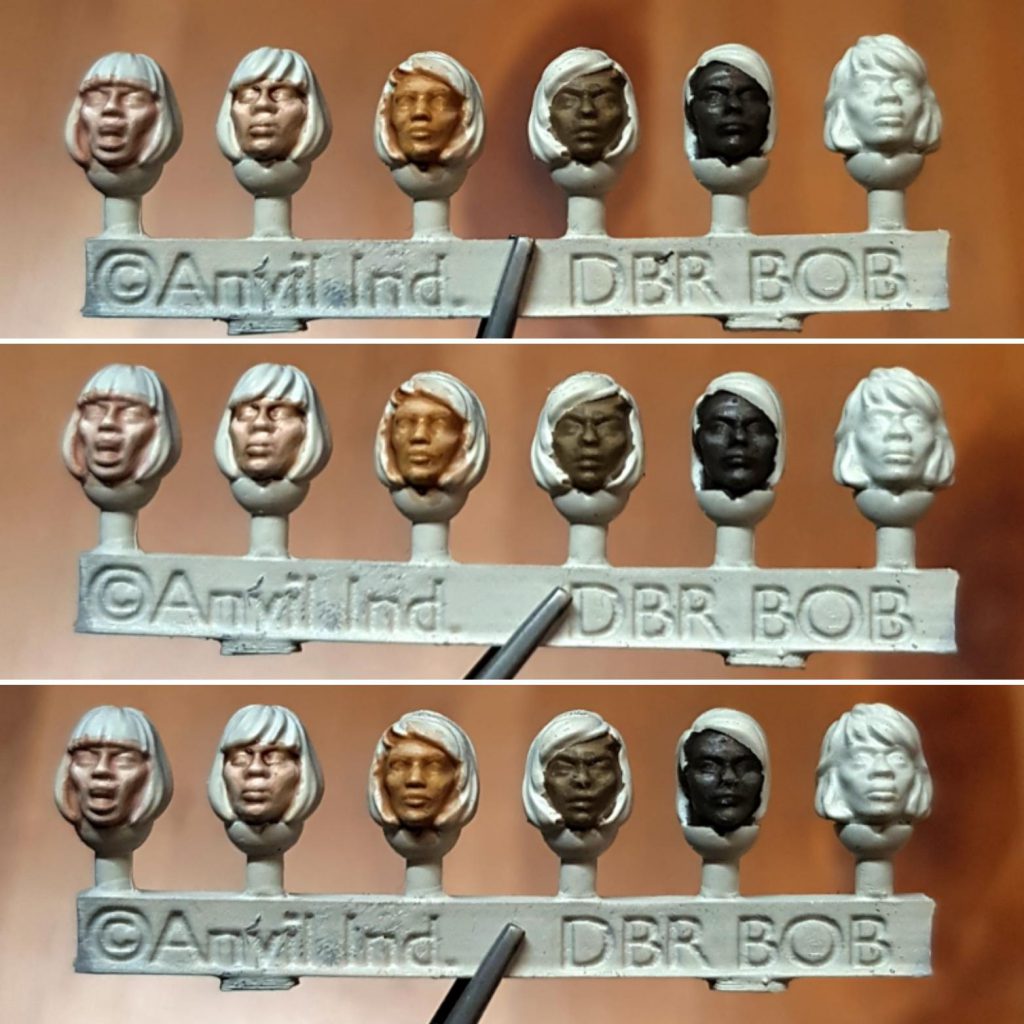
More Examples (2)
Basecoat: Wraithbone
From Left to Right
Blazon Iii (East Asian)
- Base: Basic skintone + Light Flesh (i:one)
- Shade: Reikland Fleshade + Seraphim Sepia + Lahmian Medium (1:1:1)
- Highlight #ane: Bones skintone + Low-cal Flesh + Night Sand (1:1:1)
- Highlight #2: Lite Flesh + Wraithbone (i:1)
Lighter Iv-ii (Mediterranean/Latino)
- Base: Medium Fleshtone + Salmon Rose (ane:i)
- Shade: Reikland Fleshade + Seraphim Sepia + Lahmian Medium (1:1:1)
- Highlight #ane: Kislev Mankind + Dark Sand (ane:1)
- Highlight #2: Basic Skintone + Wraithbone (i:one)
Lighter Blazon V (Heart Eastern)
- Base: Burnt Umber + Medium Fleshtone (1:ane)
- Shade: Gulliman Mankind
- Highlight #1: Burnt Umber + Medium Fleshtone (i:2)
- Highlight #ii: Burnt Umber + Kislev Flesh (1:i)
- Highlight #3: Kislev Mankind
Lighter Type Vi – Slightly lighter (South Asian)
- Base of operations: Burnt Umber + GCBB (ane:1)
- Shade: Gulliman Flesh
- Highlight #ane: Burnt Umber + Medium Fleshtone + Rose Brownish (1:1:1)
- Highlight #2: Burnt Umber + Kislev Flesh + Rose Brown (i:one:one)
- Highlight #iii: Burnt Umber + Kislev Flesh + Rose Brown (i:2:2)
Finishing Steps and Details
Shadows/Stubble/Eyeshadow
Used as a desaturated shadow shade for Type I-IV skin in adumbral areas – under the chin, sides of the cheeks, under the olfactory organ, under the hair bangs
Add more basic skintone to approximate stubble, omit skintone for eyeshadow.
- Drakenhof Nightshade + Lahmian Medium + Basic skintone (1:2:Trace)
Lips (More relevant for female faces, can be omitted)
Upper lips are darker than lower lips. Highlight upper lips once
Highlight lower lips twice and add spot of Deck Tan/White/Basic Fleshtone on lower lips as a spot highlight
- Lipstick: Burnt Red -> Red -> Carmine Cherry -> Deck Tan
- Natural: Burnt Red + Basic Fleshtone -> Add more than Basic Fleshtone to mix to generate highlight tones.
Optics
Paint burnt umber into unabridged visible eyeball. Apply streak of deck tan, leaving a thin edge of burnt umber as a blackline. Utilise a central dot of Black-Brown as the iris and pupil. Exist sure this touches the top and bottom edges of burnt umber otherwise your miniature will take a stare.
- Burnt umber -> Deck Tan -> GCBB
Cheeks
Glaze cheeks of type I and Two pare to provide the blush – this always develops due to sunday damage to the exposed cheeks. A faint tint is sufficient, don't deepen with more than layers it unless you want your model to be wearing makeup.
- Volupus Pink + Lahmian Medium + Contrast Medium (1:1:i)
Evan'due south Method
ZIVth has probably told you a whole lot of stuff nearly the specifics of melanin and the biology of peel. I don't know all that much about those things. I did, however, accept some serious art classes and really enjoyed portraiture, so I had some experience with portraying skin, and mixing colors, likewise as some of the theory virtually how light interacts with your skin.
Painting peel is great. As long as you stick to some basic principles in painting your skin, even if you don't get the exact effect you were looking for, y'all'll terminate up with something that looks like a believable skin tone, and inconsistent peel tones across the models in your army actually enhances the ground forces, rather than detracting from its appearance. Peel is a great mode to play around and add together variety in your regular army without breaking it upward as a cohesive strength. I as well think I'm non being particularly radical in saying that representing some variety on the tabletop is an objective good for the hobby.
With those things in mind, rather than presenting a specific recipe for a specific skin tone, I want to requite you a tool-kit that volition requite you lot the footing to experiment and play around on your own to achieve a diversity of effects and interesting peel colors.
What's in Cadian Fleshtone anyways?
It'south difficult to really dig into painting and mixing colors for skin without first taking a look at what is in your ubiquitous "Mankind Tone" pigment of option. If y'all wait at a traditional creative person-oriented paint line, you won't e'er notice a 'Flesh Tone' Paint. That's considering in that location isn't really a flesh-colored rock or substance they can grind up and put into a pigment medium, and traditional artists typically utilise a lot fewer pre-mixed colors than someone trying to quickly paint a consequent army.
To get a flesh color in traditional art, you mix colors. The 4 components of that are generally White, Yellow Ochre, Red, and Brown of some description. If you have a look at Game Workshop'due south flesh category y'all will encounter that pretty much every paint that isn't intended for Orks or weird sea elves is a mix of those four colors. Ungor and Kislev Flesh skew more than towards yellow ochre, while Bugman's Glow skews more red and dark-brown. This even extends to darker pare tones. A very dark skin tone will hew very close to raw umber or burnt umber, with very little of the others mixed in.
Right: P3 Khardic Flesh, mixed with white for highlights. Flesh Wash in select recesses.
Credit: Evan "Felime" Siefring
I say lighter skin tones because with darker skin, it tends to piece of work better to starting time with the brown color. If yous start with brown and highlight upwards by mixing in Cadian Fleshtone, you lot'll go a prissy light-ish warm brownish tone. You tin can too utilize white to mix in as a highlight. I would not recommend using reddish or yellow alone as highlights. Red is a strong colour and volition make things red if used lonely, and non much yellow works its way into highlights considering near ambient light has a cold, whitish hue, which nosotros'll go into more particular on after.
Correct: VMC Flat Earth, mixed with White to highlight.
Credit: Evan "Felime" Siefring
There's however a ton of variables. You can highlight with unlike colors and shades inside this general framework, play with the ranges yous go to, simply as long every bit you lot stick to those four colors and don't skew too far in any direction apart from brownish, you lot'll end upwards with something that looks adequately convincing.
Breaking the rules
So, in the terminal section I went over the basics of mixing a peel tone. Four colors. Simple, right? Now I'1000 going to tell you how to pause them. Just using four colors, and their derivative, 'Flesh Tone', will not become you the full range of homo skin colors. Dissimilar skin has different hues and saturations. People are varied.
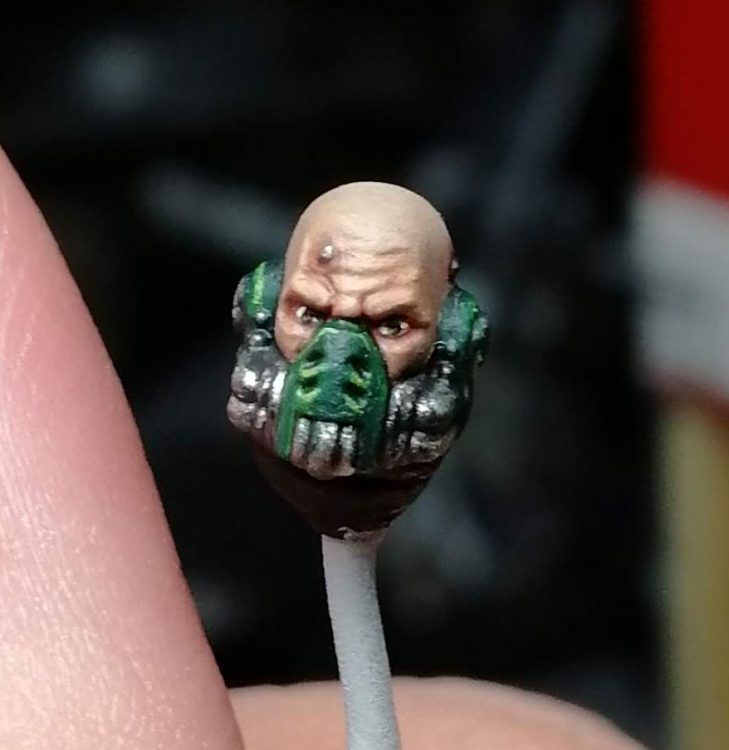
For a bones case, consider a less extreme example of the weird bounding main elf colors in Games Workshop'southward color range. By taking a touch of grayness and mixing information technology into your flesh tone, then highlighting up from at that place using flesh tone (or even white, depending on the wait you want to accomplish), you will go a skin tone that is much more desaturated than one that has more red/orangish tones in it.
Credit: Evan "Felime" Siefring
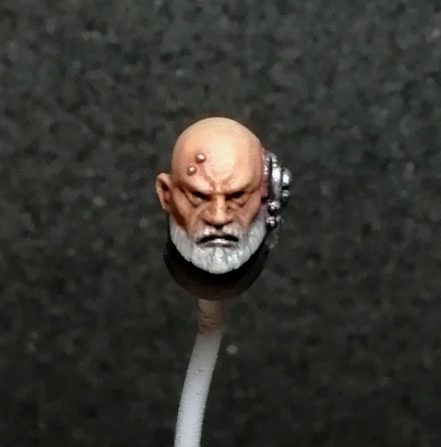
Y'all can then push button that further and get a more pallid look, verging on your ocean elf colors. Playing at the very edge of what looks reasonable can be a great mode to sell something as inhuman. With my Custodes skin, I tend to button towards greyness from a mankind tone base, to really push button that these are massively genetically altered behemothic men in golden armor, and you can use a similar effect to emphasize the otherness of eldar or elves.
Credit: Evan "Felime" Siefring
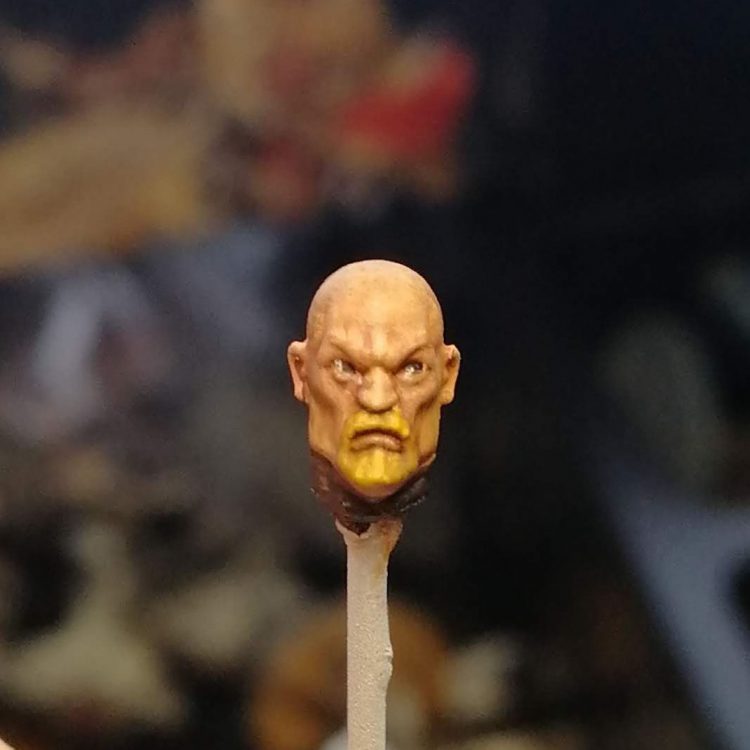
With something like zombies, you can push the envelope very far. Yous can employ pretty much any color. Green, Royal, Blue. Any color mixed with flesh tone, so highlighting upward with increasing quantities of a light flesh tone added will look great on a zombie. Only don't push them besides far or they will just read as whatever colour you tinted with instead of as oddly colored flesh.
If y'all're keeping things grounded, a general dominion of thumb is to call back that, if you removed all of the colors but your accent color and the brown in the mix, would the colour still read as brown? This means you can mix in a tiny bit with your lighter skin tones, while as y'all get darker (and thus take more than brown), yous tin get away with adding a lot more colour into the mix. For case, I love the tone I get mixing purple into brown to almost reach a plum color, while if you put whatever noticeable hint of purple into a very pale skin tone, it would look quite odd.
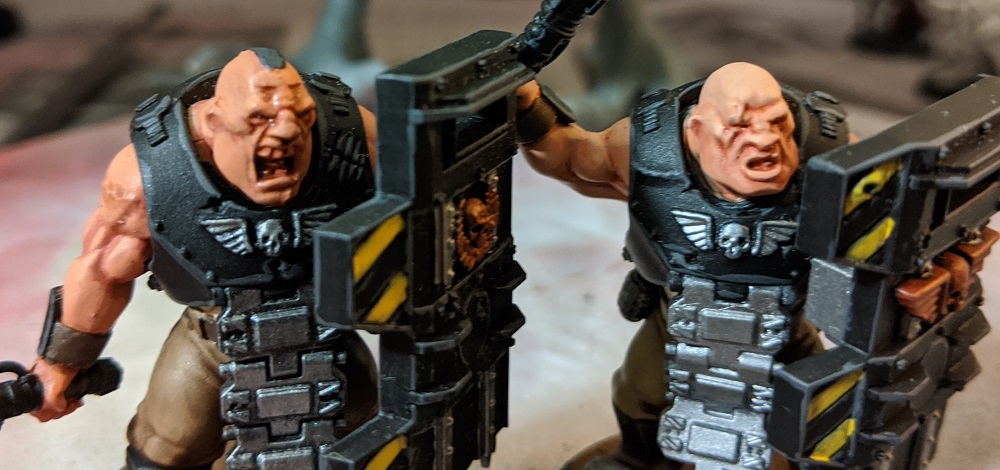
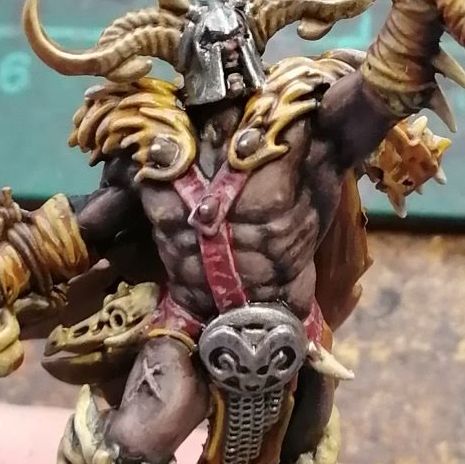
Left: VMC Flat Earth mixed with VMA Medium Olive, highlighting to pure Flat Earth. Watered downwardly Nuln Oil to emphasize scars and make.
Centre: VMC Flat Globe mixed with VGC Hexed Lichen, Highlighted up to well-nigh pure Flat Earth. Touch of Nuln Oil in extreme recesses (spine of lower dorsum, under pectorals) to increase contrast.
Right: VMC Flat Earth mixed with VMC Black, highlighted to almost pure apartment world, with pure Flat World used to pick out details like scars.
Credit: Evan "Felime" Siefring
Some Light Reading
Earlier, I promised to talk about how lite is typically a white color and what this means for skin. Now is the time, and I will try to arrive as understandable as possible (and I am sure my understanding is grossly simplified to get-go with.) The light making upward what yous see when y'all wait at skin is actually made upwards of lite that come from iii different things occurring on and inside the skin. You don't need to worry about this too much unless you're doing Golden Daemon level work, but a basic understanding tin help inform your colour choices when working with skin.
The showtime is lite that is bounced off of the pare retaining the colour of the source light. In typical conditions (outside, under a blue sky) this is a slightly cool (tinged with blueish) white color. Typically, when you're taking flesh tone and mixing in white to highlight, this is what you're approximating. On the surfaces where light is shining direct, y'all get more white showing through.
The second is light that hits the peel and bounces off, taking on the colour of the actual surface of the peel. This is somewhat self explanatory, and the most similar to painting non pare-based objects.
The tertiary is light that goes through the peel, bouncing around inside the torso, and emerges dorsum out, taking on a color that is a mix of the skin colour, forth with the blood and mankind below. When you run into flushed cheeks or red on the tip of someone'southward nose, their skin color isn't really changing, just the color of what'due south beneath every bit more blood is present in the surface area. This is what a red tinged flesh wash like Reikland Fleshshade is trying to approximate.
In that location are two principal takeaways hither. The beginning is that (as a very basic approximation, depending on individual) the darker the skin, the less light is transmitted through to bounce around inside and come out, making the reflected low-cal more ascendant. That ways that you tin mix more than environmental colors in the highlights on a dark skinned model. If you lot're portraying a typical outdoors scene under a bluish heaven, this will be blue-white. The 2nd takeaway is that if you're doing OSL, peel will actually take on less of the lite shone on it than its surround, with light and scarlet peel reflecting the least directly, and very dark black-brown skin tones reflecting the nearly. This is less useful for your average painter such as myself, simply something to recollect nigh when yous are trying to actually push button things to the next level.
In Exercise
And so, I've talked almost a lot of theory and paint mixing. I don't typically mix upwardly my own mankind tones in painting. Hell, I'one thousand not as good a painter, nor exercise I spend as much fourth dimension on private models equally my co-authors. If you're looking for brandish models or to win painting awards, go listen to them. If y'all're looking for a flexible technique that volition exercise some pretty dainty skin for high tabletop level models, and so I may have something useful to impart.
When I paint skin, typically I will pick out two colors. They should be far enough apart that y'all tin can get a decent corporeality of dissimilarity using just them. For example, for a Caucasian skin tone, P3 Khardic flesh and VMA Sand (Ivory). 1 of my favorite recipes for dark pare is VGC Hexed Lichen and VMC Apartment World. (VMC Apartment Earth is one of my staples and 1 of 4 paints I keep a spare bottle of on hand)
Right: VMC Pale Flesh washed with GW Guilliman Flesh Contrast, diluted with Lahmian Medium.
Credit: Evan "Felime" Siefring
I put down a solid basecoat of the color I want the shadows to be. On anything bigger than a face, you will definitely need two thin coats. On a face y'all may exist able to get away with one, but probably not. This shadow color doesn't need to be either ane of your paint colors. For a darker caucasian color, I might go with a basecoat of pure Khardic Mankind. For a lighter colour, the base glaze might have a pretty meaning portion of Sand in it. The same two paints tin can do a variety of shades.
I then highlight upwardly, mixing in more and more than of the lighter color every bit I go. I typically exercise two stages of highlighting. A base glaze, a highlight that picks out everything but the recesses, and a terminal highlight focusing more on the edges and upper portions of all the shapes.
For a last step, I take a step back, and adjust, generally with washes. A lot of time you lot won't have quite every bit much definition in some spots as you lot'd similar. This might mean dropping a recess shade into the model'due south eyes or nether certain muscles, or a slight coat, or farther highlights in places. A little work with glazes, diluted dissimilarity paints, or recess shades can do a lot to actually brand a face or skin pop. Subtler faces tend to answer especially well to washes and glazes, and without them information technology tin can be very hard to make them look right without putting down excessive numbers of layers. I tend to this on a very ad-hoc basis, and the other two methods detailed here have a lot of great information on how to do that.
Now, I hope I've armed you with a flexible technique and the knowledge that you tin can practise a great deal when it comes to skin with a modest option of paints, many of which you probably already own, in not likewise much time. At present, I leave you in the very capable hands of Lupe for something completely unlike.
Tried and tested (Lupercalcalcal'due south Method)
Those two talk a lot virtually all kinds of theory and blending and then on. But I'll level with y'all: I didn't learn to paint skin in art classes, I learned to paint peel on minis, so my approach is a little different.
First up, I employ a lot of paint mixes, only they're to become specific shades in particular ratios, and I don't do much blending. Second, I employ a lot of Citadel shade paints and also glazes on my skin work. Thirdly, I have recipes for you to follow, because I'1000 a lazy arse who mostly paints skin the same way each time.
Hither are some of my general tips on peel before I launch into that:
- Start lighter than yous call back. Adding depth is easier when you lot shade and highlight, than if you're stuck just highlighting
- Thin your paints. No, more than than that. Consider investing in some thinner medium and glaze medium (I use Vallejo) to terminate your paint splitting when you lot thin it down enough for skin work
- Go a wet palette for the love of God. Other things you could get away with information technology maybe, but for peel y'all need to keep your thin paint smooth and fresh, and you need an easy fashion to mix together your colours for transitions
- Spend ninety% of your fourth dimension on the face. It's where everyone volition instinctively look anyway
Nosotros'll start with Light skin because it'due south easiest, and considering nosotros're basically using the aforementioned method for all the recipes . Once y'all've got this one down, you can do the others.
- Basecoat Cadian Fleshtone. Really nice and smooth and strong. Might take a couple of layers – if yous're struggling over a black prime, slap down a midtone first and then basecoat over that.
- Option out the recessed details with 2:1 Reikland Fleshshade:H2o. If yous are lazy then but slap information technology all over 1:1
- Pick out the deeper recesses and with four:one Doombull Brown:Black thinned heavily
- Tidy upward your basecoat, bringing everything not a recess back to Cadian
- Mix your Cadian with a dab of Ushbati Os (about 3:1) and highlight the raised areas (those that would catch the light). Then add together a trivial more than Ushbati and do it again, but on slightly smaller areas that are more than prominent. Go along doing this until you're at 1:one Cadian: Ushbati.
- Now add together a petty dot of White (Scar, or your choice of apartment white) and continue going in the same way, until you're at 1:ane with your starting Cadian:Ushbati mix and your white (that's 1:ane:2 overall). You're getting just teeny tiny details at this point.
- Brand up a 4:1 Carroburg Crimson:Khorne Red mix and and then sparse the hell out of it. You want information technology well-nigh transparent. Then become some on your castor, wipe most of it off, and carefully glaze anywhere that'll be flushed (eyes, nose and mouth are the primal ones). You tin merely utilise Khorne thinned way manner fashion downwardly, but I think carroburg gives a overnice tone to it. And so re-highlight with your last mankind mix only on the most raised parts.
Wow Lupe, I hear yous say, with my superpower to hear people when they read things I wrote on the net: that's a lot of steps. And some of them are actually like 8 steps cunningly disguised equally one! Well, if you lot're doing this on a whole buncha minis:
- Basecoat Cadian Fleshtone
- Wash all over with Reikland Fleshshade
- Impact upwardly your basecoat
- Highlight raised areas with Kislev Flesh
- Highlight the absolute top points with Flayed Ane Mankind
Ta da! It won't look as smooth or deep or alive, merely it'due south way quicker.
At present nosotros've got the basic techniques down, permit's await at the other recipes I trot out on the regular. All of these piece of work in exactly the same manner . They just use different colours. Each one has a display and a table variant. Going from lightest to darkest:
Pale pare
Display Quality:
- Basecoat 1 Flayed 1 Mankind
- Shade recesses 2:ane Reikland Fleshshade:H2o
- Shade deep recesses iv:i Doombull Dark-brown:Black heavily thinned
- Reapply your basecoat
- Highlight 3:1 Flayed One Mankind:Pallid Wych Flesh then progressively to 1:i
- Add a dot of white and proceed going until y'all get to 1:1:1 Flayed One: Pallid Wych:White
- Glaze 4:ane Reikland Fleshshade:Mephiston Crimson heavily thinned on flushed areas, so retouch concluding highlight
Tabletop quality:
- Basecoat Flayed One
- Shade Reikland
- Touch upwards basecoat
- Highlight i:1 Flayed Ane:Pallid Wych
- Highlight Pallid Wych
Lite skin
Display quality:
- Basecoat Cadian Fleshtone
- Shade recesses 2:1 Reikland Fleshshade:H2o
- Shade deep recesses four:1 Doombull Brown:Black heavily thinned
- Reapply your basecoat
- Highlight iii:1 Cadian Fleshtone: Ushbati Bone, and so progressively to one:one
- Add a dot of white and keep going until you get to 1:1:2 Cadian: Ushbati:White
- Glaze 4:ane Carroburg Crimson:Khorne Red heavily thinned on flushed areas, then retouch final highlight
Tabletop quality:
- Basecoat Cadian Fleshtone
- Shade Reikland Fleshshade
- Affect upwardly basecoat
- Highlight Kislev Flesh
- Highlight Flayed One Flesh
Bronze peel
Display quality:
- Basecoat 1:ane Cadian Fleshtone:Ratskin Flesh
- Shade recesses 1:1 Reikland Fleshshade:Agrax Earthshade
- Shade deep recesses 2:1 Doombull:Black heavily thinned
- Reapply your basecoat
- Highlight 3:3:ii Cadian: Ratskin:Flayed One, then progressively to ane:one:ii
- Add a dot of Screaming Skull and keep going until you get to 1:1 previous mix: Screaming Skull
- Glaze two:ii:1 Reikland Fleshshade: Seraphim Sepia:Khorne Blood-red heavily thinned on flushed areas, then retouch last highlight
Tabletop quality:
- Basecoat Ratskin Flesh
- Shade Reikland
- Retouch Ratskin
- Highlight ane:1 Ratskin:Cadian
- Highlight 1:1:1 Ratskin:Cadian:Flayed One
Mid skin
Brandish quality:
- Basecoat Knight-Questor Flesh
- Shade recesses 2:one:2 Reikland Fleshshade:Agrax Earthshade:Water
- Shade deep recesses ii:1 Catachan Fleshtone:Black heavily thinned
- Reapply your basecoat
- Highlight 3:1 Knight-Questor Flesh: Cadian Fleshtone, then progressively to ane:1
- Add together a dot of Ushbati Bone and keep going until you become to 1:one:2 Knight-Questor:Cadian: Ushabti
- Glaze 4:1 Druchii Violet: Khorne Ruby-red heavily thinned on flushed areas, so retouch final highlight
Tabletop quality:
- Basecoat Knight-Questor Mankind
- Shade Reikland Fleshshade
- Reapply basecoat
- Highlight Cadian Fleshtone
- Highlight Kislev Flesh
Dark skin
Display quality:
- Basecoat Catachan Fleshtone
- Shade recesses 2:one Druchii Violet: Water
- Shade deep recesses ane:1 Rhinox Hide:Black heavily thinned
- Reapply your basecoat
- Highlight 3:1 Catschan Fleshtone: Knight-Questor Flesh, and then progressively to 1:ane
- Add a dot of Kislev Flesh and continue going until you lot go to i:ane:2 Catachan: Knight-Questor:Kislev
- Coat iv:1 Reikland Fleshshade:Khorne Red heavily thinned on flushed areas, and then retouch final highlight
Tabletop Quality
- Basecoat Catachan Fleshtone
- Shade Druchii Violet
- Retouch Basecoat
- Highlight Bloodreaver Flesh
- Highlight Knight-Questor Flesh
Tweaks
That's your baseline, but information technology'south just a place to start. You can easily tweak skin in diverse ways past calculation little touches of glazes or filters. Try these:
- A glaze of Druchii Majestic round the eyes makes a mini look tired and haggard
- A shade of thinned Athonian Camoshade will make them look sickly
- A shade of thinned Carroburg Crimson makes lighter skin look inflamed and flushed, and darker skin cherry and warmer
- A glaze of thinned Nurgles Rot applied evenly over the whole area makes pare expect sweaty and gives it an unhealthy sheen
- Conversely, a very thin glaze of Gloss Reikland Fleshshade will make information technology wait glistening and oiled
Diversify Your Army
That wraps up our tutorials on painting skin. Between these methods, we hope yous'll be able to discover one that works for you (or fifty-fifty a mix of the techniques). Nosotros may accept covered the basics of peel hither, merely annotation that there'south more to come — in future How to Pigment Everything articles, we'll cover the peel of fantasy races like Orks/Orruks, Zombies, and Tau, and we'll besides embrace more specific details like painting faces, cuts, bruises, and scars, then keep an eye out. And as always, if you accept any questions or feedback, or yous but want to share your pretty models with us, feel free to drop us a notation in the comments below, or email us at contact@goonhammer.com.

Source: https://www.goonhammer.com/how-to-paint-everything-human-skin/
Posted by: millerwomenthe.blogspot.com
0 Response to "How To Paint Pale Skin Warhammer"
Post a Comment